How to Create Custom DIY Shoe Storage Solutions
Effective shoe storage is a common challenge in many households. The accumulation of footwear near entryways, in closets, and under furniture can lead to clutter and disorganization. Commercially available shoe racks and organizers offer solutions, but these are often limited in terms of size, style, and functionality. Creating custom DIY shoe storage solutions provides the opportunity to tailor storage to specific needs, space constraints, and aesthetic preferences. This article outlines the process of designing and constructing custom shoe storage solutions, addressing key considerations and offering practical approaches for various skill levels.
Assessing Needs and Defining Requirements
The initial step in creating a custom shoe storage solution involves a thorough assessment of needs and a clear definition of requirements. This foundational stage ensures the resulting storage is practical and meets the specific demands of the household.
First, inventory the existing shoe collection. Categorize shoes by type (e.g., athletic shoes, dress shoes, boots, sandals), and count the number of pairs in each category. This inventory provides a concrete basis for determining the required storage capacity. Consider seasonal variations; the storage solution may need to accommodate additional footwear during certain times of the year. Boots, for example, require more vertical space and may need specialized storage during the colder months.
Next, evaluate the available space. Measure the dimensions of the area where the shoe storage will be located. This could be a hallway, a closet floor, under a staircase, or even a wall. Note any architectural constraints, such as door swings, electrical outlets, or heating vents. The available space dictates the size and configuration of the storage unit. Consider maximizing vertical space, especially in areas with limited floor space. Wall-mounted shelves or stacked units can provide ample storage without occupying valuable floor area.
Finally, consider the overall aesthetic and design preferences. The shoe storage solution should complement the existing décor and style of the space. Determine the desired materials, finishes, and overall look. Consider factors such as color, texture, and hardware. For example, a modern minimalist aesthetic might call for sleek, clean lines and neutral colors, while a rustic aesthetic might benefit from reclaimed wood and distressed finishes. Consider the level of visibility desired. Open shelves provide easy access and display shoes, while closed cabinets conceal clutter. The choice depends on personal preference and the overall design goals of the space.
Designing and Planning the Storage Solution
Once the needs and requirements have been established, the next step is to design and plan the shoe storage solution. This involves conceptualizing the design, creating detailed plans, and selecting appropriate materials.
Start by sketching out different design ideas. Consider various configurations, such as shelves, cubbies, benches with storage, or rolling carts. Explore online resources and design magazines for inspiration. Experiment with different layouts and arrangements to determine the most efficient and visually appealing option. Prioritize functionality and ease of use. Ensure that shoes can be easily accessed and stored without creating clutter or disorganization.
Create a detailed plan with precise measurements. This plan should include the dimensions of the storage unit, the spacing between shelves or cubbies, and the placement of any hardware. Use a CAD program or simple graph paper to create a scale drawing. This detailed plan serves as a blueprint for construction and helps to avoid costly mistakes.
Select appropriate materials for the construction. Common materials include wood (e.g., plywood, solid wood, MDF), metal, and plastic. Consider the durability, cost, and aesthetic properties of each material. Wood is a versatile option that can be easily customized with paint or stain. Plywood is a cost-effective option for shelving and structural components, while solid wood provides a more premium look and feel. MDF (medium-density fiberboard) is smooth and easy to paint but may not be as durable as wood. Metal is a strong and durable option for frames and supports, while plastic is lightweight and water-resistant. Choose materials that are appropriate for the intended use and the overall design of the storage solution.
Plan the construction process in detail. Determine the tools and equipment needed, such as a saw, drill, screwdriver, measuring tape, and level. Create a cut list that specifies the dimensions of each piece of material. This helps to minimize waste and ensures accurate cuts. Consider the joinery methods to be used, such as screws, nails, or dowels. Select appropriate hardware, such as hinges, handles, and drawer slides. A well-defined plan streamlines the construction process and ensures a successful outcome.
Construction Methods and Techniques
The construction phase involves assembling the shoe storage solution according to the detailed plan. This requires careful attention to detail and adherence to proper construction techniques.
Begin by cutting the materials according to the cut list. Use a saw to make accurate and clean cuts. Ensure that all pieces are the correct size and shape. Sand any rough edges or surfaces to create a smooth finish. This step is crucial for achieving a professional-looking result. Accuracy in cutting and sanding ensures that all components fit together properly.
Assemble the structural components of the storage unit. Use screws, nails, or dowels to join the pieces together. Ensure that all joints are strong and secure. Use wood glue in addition to fasteners for added strength. Check for squareness and alignment throughout the assembly process. A level and measuring tape are essential tools for ensuring that the structure is plumb and true.
Install shelves, cubbies, or drawers according to the plan. Use appropriate hardware to secure these components to the frame. Ensure that shelves are level and evenly spaced. Drawers should slide smoothly and easily. Pay attention to detail when installing hardware, such as hinges and drawer slides. Proper installation ensures that these components function correctly and last for a long time.
Finish the storage unit with paint, stain, or varnish. Prepare the surface by sanding it smooth and applying a primer. Choose a finish that complements the overall design and protects the material from damage. Apply multiple coats of finish for added durability. Allow each coat to dry completely before applying the next. A well-applied finish enhances the aesthetic appeal of the storage unit and protects it from wear and tear.
Specific DIY Shoe Storage Ideas
The principles outlined above can be applied to a variety of DIY shoe storage projects. Here are a few specific ideas to consider:
Repurposed Pallet Shoe Rack: Wooden pallets can be repurposed into rustic and functional shoe racks. Sand the pallet to remove any splinters and treat it with a sealant or stain. Pallets can be leaned against a wall or mounted horizontally to create shelves. This is a cost-effective and environmentally friendly option.
Floating Shoe Shelves: Floating shelves provide a minimalist and space-saving storage solution. Use solid wood or plywood to create shelves of varying lengths. Mount the shelves to the wall using heavy-duty brackets. This option is ideal for small spaces and allows shoes to be displayed in an organized manner.
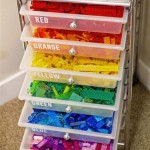
Under-Bed Shoe Storage: Maximize unused space under the bed by creating shallow storage containers on wheels. Use plywood or MDF to construct the boxes. Add casters to the bottom for easy movement. This option is discreet and keeps shoes out of sight.
Entryway Bench with Shoe Storage: Construct a bench with built-in shoe storage underneath. This provides a functional seating area and a convenient place to store shoes near the entryway. Use solid wood or plywood for the bench frame. Create shelves or cubbies underneath the seat for shoe storage.
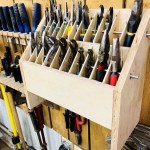
Rolling Shoe Cart: A rolling shoe cart provides a mobile storage solution that can be easily moved from room to room. Use plywood or metal to construct the cart frame. Add shelves or cubbies for shoe storage. Attach casters to the bottom for mobility.
Hanging Shoe Organizer from Repurposed Ladder: Use an old wooden ladder for creating a unique and vertical shoe organizer. Clean and sand the ladder. Each step acts as a shelf. Lean it against the wall in a closet or entryway.
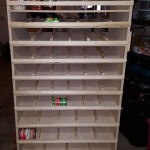
Cubby Style Shoe Organizer: Construct a frame using plywood or MDF, then divide it into individual cubbies. This is a great way to organize and display shoes, and can be customized to fit any space. Each shoe has its own designated space.
These are just a few examples. The possibilities are endless, limited only by creativity and available resources. By carefully assessing needs, planning the design, and utilizing appropriate construction techniques, it is possible to create custom DIY shoe storage solutions that are both functional and aesthetically pleasing.

Diy Closet Shoe Storage Idea Thistlewood Farm

How To Make A Super Sized Shoe Rack On Budget

Diy Shoe Storage Cabinet Shanty 2 Chic

Diy Shoe Rack Erin Spain

Diy Shoe Rack Erin Spain

How To Make A Super Sized Shoe Rack On Budget
:max_bytes(150000):strip_icc()/315879602_494198832688109_3313369280607325317_n-8a6ca9b8c7b3478a9cc08e649518c0c9.jpg?strip=all "36 Clever Shoe Storage Ideas To Tidy Up Small Spaces")
36 Clever Shoe Storage Ideas To Tidy Up Small Spaces

Diy Closet Shoe Trays Jaime Costiglio

26 Homemade Diy Shoe Rack Ideas Storage

Built In Shoe Rack How To Checking With Chelsea
Related Posts