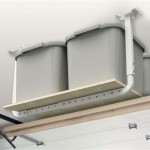
DIY Overhead Garage Storage Rack: Maximizing Space and Organization
A cluttered garage can quickly become a frustrating and inefficient space. With limited floor space and a tendency for items to pile up, it can feel like there's never enough room. However, by utilizing the vertical space above your head, you can significantly increase storage capacity and regain control of your garage. A DIY overhead garage storage rack is a cost-effective and practical solution to maximize your garage's potential.
Building your own overhead storage rack offers several advantages over purchasing a pre-made rack. You can customize the design to fit your specific needs and the dimensions of your garage. This includes the size, number of shelves, and overall configuration. Additionally, DIY projects often allow for more flexibility in material selection, enabling you to choose durable and affordable materials. This can be particularly beneficial when working with larger structures that require robust support.
Essential Tools and Materials
Before embarking on the project, it's crucial to gather the necessary tools and materials. This will ensure a smooth and efficient construction process.
- Measuring tape: Essential for taking accurate measurements of your garage space and the desired dimensions of the rack.
- Level: Ensuring a level rack is crucial for safety and stability.
- Drill/Driver: For drilling pilot holes and fastening the rack components.
- Saw: A saw, such as a circular saw or jigsaw, is necessary for cutting the wood to size.
- Safety gear: Always prioritize safety by wearing safety glasses, gloves, and appropriate clothing when working with power tools.
- Structural lumber: 2x4s or 2x6s are commonly used for the frame of the rack. Choose high-quality lumber for durability.
- Plywood or melamine sheets: These will serve as the shelves of the rack. The thickness will depend on the weight of the items being stored.
- Hardware: This includes screws, bolts, nuts, washers, and brackets for attaching the shelves to the frame.
- Paint or stain: Optional, but can enhance the aesthetics and protect the wood.
Step-by-Step Guide
Once you've assembled all the necessary materials and tools, you can begin building your overhead storage rack. The following steps provide a general guideline:
- Determine the dimensions: Measure the available space in your garage and decide on the dimensions of your rack. Consider the height and width of the rack, as well as the number of shelves you need. Also, take into account the weight of the items you'll be storing to ensure the rack is strong enough.
- Cut the lumber: Use a saw to cut the lumber according to your chosen dimensions. Ensure precise cuts for a stable and level rack.
- Assemble the frame: Join the pieces of lumber together using screws or bolts to create the frame. Use brackets and other fasteners for additional strength and stability.
- Attach the shelves: Cut the plywood or melamine sheets to fit the desired shelf size. Attach them to the frame using brackets or screws. Ensure the shelves are level and secure.
- Install the rack: Position the assembled rack in the desired location and securely attach it to the ceiling joists using heavy-duty brackets or anchors. Take into account the load capacity of the joists when installing the rack.
- Paint or stain (optional): If desired, paint or stain the rack to protect the wood and enhance its appearance.
Safety Considerations
Safety is paramount when building and utilizing any type of overhead storage. Here are crucial considerations:
- Secure Installation: Ensure the rack is firmly attached to the ceiling joists using proper hardware and techniques. Never rely solely on drywall anchors for support.
- Weight Capacity: Be conscious of the weight capacity of the rack and the materials you are using. Avoid overloading the rack as this can create a safety hazard.
- Safe Access: Use a sturdy ladder or step stool when accessing the rack to prevent falls. Always follow safety guidelines and ensure the ladder is properly positioned.
- Regular Inspection: Periodically inspect the rack for signs of wear, damage, or loose connections. Address any issues promptly.
By following these guidelines, you can build a safe and reliable overhead storage rack that maximizes your garage space and enhances organization.

Diy How To Build Suspended Garage Shelves Building Strong

Diy Overhead Garage Storage Musgroves In Christchurch

Diy Garage Storage Ceiling Mounted Shelves Giveaway

Diy Garage Ceiling Storage And Wall Organization Angela Marie Made

How To Install Overhead Garage Storage Stanley Tools

Pin Page

Diy Garage Ceiling Storage Shelves

24 Affordable Diy Garage Storage Projects Family Handyman

Overhead Garage Storage Shelf Her Tool Belt

Diy Garage Ceiling Storage Shelves
Related Posts


