Creating A Stylish DIY Headboard With Storage Ideas
The bedroom serves as a personal sanctuary, a space for rest and rejuvenation. The headboard, often the focal point of the room, plays a significant role in defining the aesthetic and functionality of the sleep environment. While commercially available headboards offer various styles, a do-it-yourself (DIY) approach allows for customization, budget control, and the integration of valuable storage solutions. This article details the process of crafting a stylish and functional headboard with integrated storage, providing guidance on design considerations, material selection, and construction techniques.
The primary advantage of a DIY headboard is the ability to tailor the design to specific needs and preferences. Instead of being limited to pre-existing models, individuals can create a headboard that perfectly complements the room's décor and maximizes space utilization. By incorporating storage elements, the headboard can serve as a multi-functional piece of furniture, alleviating clutter and providing convenient access to essential items.
Planning and Design Considerations
Before embarking on the construction process, careful planning is crucial. This involves assessing the available space, determining the desired storage capacity, and selecting a style that aligns with the overall bedroom aesthetic. Measurements of the bed frame and available wall space are essential for accurate design and construction. Consider the height of the mattress and the desired height of the headboard above the mattress to ensure comfortable use and visual appeal. Draw a detailed sketch or use computer-aided design (CAD) software to visualize the final product and identify potential challenges.
Storage requirements should also be carefully considered. Decide what items need to be stored within the headboard. Common storage options include shelves for books and decorative items, enclosed cabinets for personal belongings, and hidden compartments for valuables. The type and quantity of items to be stored will influence the size and configuration of the storage compartments. Ensure that the storage compartments are easily accessible and do not compromise the structural integrity of the headboard.
Style considerations are equally important. Headboards can be designed to complement various interior design styles, such as modern, minimalist, rustic, or traditional. Upholstered headboards add softness and texture, while wooden headboards offer a more natural and classic look. Consider incorporating design elements that reflect personal taste and create a cohesive aesthetic within the bedroom. The color and finish of the headboard should also be carefully selected to complement the existing furniture and wall colors.
Integrating lighting into the headboard design can enhance both functionality and aesthetics. Recessed lighting or adjustable reading lights can provide focused illumination for reading or other activities. Strategically placed LED strip lights can create a soft, ambient glow that adds warmth and atmosphere to the room. Ensure that the wiring for any integrated lighting is properly installed and concealed for safety and visual appeal.
Material Selection and Preparation
The choice of materials will significantly impact the look, durability, and cost of the headboard. Wood is a popular choice due to its versatility, availability, and ease of workability. Plywood, MDF (medium-density fiberboard), and solid wood are all viable options, each with its own advantages and disadvantages. Plywood is cost-effective and relatively strong, while MDF offers a smooth surface that is ideal for painting or laminating. Solid wood provides superior durability and a natural aesthetic, but it is typically more expensive.
Upholstery fabrics can be used to add texture, color, and comfort to the headboard. Choose durable and easy-to-clean fabrics that complement the overall design. Consider using batting or foam padding to provide cushioning and enhance the comfort of the headboard. Other materials that may be needed include hardware such as screws, nails, hinges, and drawer pulls, as well as finishing materials such as paint, stain, or varnish.
Prior to construction, all materials should be properly prepared. Wood should be cut to size and sanded smooth. Plywood and MDF may require edge banding to conceal raw edges and create a more finished look. Upholstery fabrics should be cut to size, allowing for seam allowances. Any necessary hardware should be gathered and organized for easy access during the construction process.
Safety is paramount when working with power tools and materials. Always wear appropriate safety gear, such as safety glasses, gloves, and a dust mask. Ensure that the work area is well-ventilated and free of obstructions. Familiarize yourself with the operating instructions for all power tools before use. Take breaks as needed to avoid fatigue and maintain focus. In all stages follow safety protocols.
Construction Techniques and Storage Integration
The construction process will vary depending on the chosen design and materials. A basic headboard frame can be constructed using wood screws or nails. Ensure that all joints are secure and properly aligned. For upholstered headboards, the frame should be wrapped in batting or foam padding and then covered with the chosen fabric. Staple the fabric securely to the back of the frame, pulling it taut to create a smooth and wrinkle-free surface.
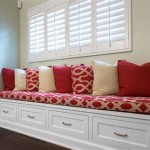
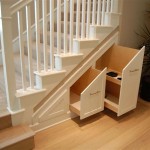
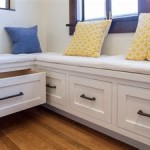
Integrating storage into the headboard requires careful planning and execution. Shelves can be created by attaching horizontal pieces of wood to the frame. Cabinets can be constructed using plywood or MDF, with hinges and latches to secure the doors. Hidden compartments can be concealed behind hinged panels or sliding drawers. Ensure that all storage compartments are properly supported and can bear the weight of the stored items. Consider using drawer slides for smooth and easy drawer operation.
Wiring for integrated lighting should be installed before the headboard is fully assembled. Run the wiring through designated channels or conduits to conceal it and prevent damage. Connect the wiring to a power source, ensuring that all connections are secure and properly insulated. Test the lighting to ensure that it is functioning correctly before completing the assembly process.
Once the headboard is assembled, it can be attached to the bed frame or mounted to the wall. Wall-mounted headboards offer a clean and modern look, while headboards attached to the bed frame provide more stability. Use appropriate hardware to securely attach the headboard to the bed frame or wall. Ensure that the headboard is level and properly aligned before tightening all the fasteners.
Finishing touches can enhance the appearance and durability of the headboard. Apply paint, stain, or varnish to protect the wood and enhance its natural beauty. Attach decorative hardware, such as drawer pulls or knobs, to the storage compartments. Add any desired embellishments, such as trim or molding. Inspect the headboard carefully for any imperfections and make any necessary repairs or adjustments.
The process can be broken down into more manageable steps:
- Building the Frame: This provides the structural support for the entire headboard.
- Adding Storage Compartments: Integrate shelves, cabinets, or drawers according to the design.
- Upholstering (If Applicable): Wrap the frame with padding and fabric for a softer aesthetic.
- Installing Lighting (If Applicable): Connect wiring and mount lights securely.
- Finishing the Surface: Paint, stain, or varnish the wood for protection and style.
- Attaching to Bed Frame or Wall: Secure the headboard to the bed or wall using appropriate hardware.
Key Points For A Successful Project
A successful DIY headboard project hinges on several key elements: meticulous planning, accurate execution, and attention to detail. Following these key points allows the possibility of a functional and aesthetically pleasing outcome, enhancing the bedroom's comfort and organization.
- Accurate Measurements and Planning: Precisely measuring the available space, bed frame, and desired features is fundamental. A comprehensive plan, including a detailed sketch or CAD drawing, minimizes errors and ensures a structurally sound and visually appealing final product. Failing to plan allows for errors.
- Safe and Proper Tool Usage: Operating power tools safely and effectively is important to protect both the crafter and the project. Adhering to safety guidelines, wearing appropriate protective gear, and familiarizing oneself with tool manuals is imperative. Incorrect use of tools potentially ends up with severe injury.
- Secure Fastening and Structural Integrity: The headboard's structural integrity is dependent on secure fastening of all components. Using appropriate screws, nails, or adhesive, and ensuring proper alignment of joints, is vital for a durable and safe headboard. Structural breakdown could cause injury to the user.
By adhering to these key points, individuals can transform a simple bedroom accessory into a functional and stylish statement piece, tailored to their specific needs and preferences. The process, while potentially challenging, offers a rewarding experience and a unique enhancement to the home environment.
:strip_icc()/102063020-3aad3b4b93404e84ae239f728901cc61.jpg?strip=all "How To Build A Platform Style Diy Bed Frame With Storage")
How To Build A Platform Style Diy Bed Frame With Storage

Diy 60 Headboard With Storage And Fold Down Trays

How To Make A Headboard With Storage

Diy Projects Archives

Diy Storage Beds Ideas Designs Mattress Mick S

Weekend Project How To Build A Rustic Headboard With Built In Storage Manmadediy

32 Diy Headboard Ideas For A Low Cost Bedroom Refresh

Diy Full Or Queen Size Storage Bed Shanty 2 Chic

How To Build A Queen Size Storage Bed Addicted 2 Diy

6 Overbed Storage Ideas You Haven T Thought Of
Related Posts