Creating A Stylish DIY Headboard With Storage Ideas For Dorms
Dorm room living often necessitates creative solutions to maximize limited space and personalize a sterile environment. A DIY headboard with integrated storage addresses both these needs effectively. It provides a focal point for the room’s décor and offers valuable organizational space for books, electronics, and personal items. This article outlines several design options and construction techniques for creating a functional and stylish dorm room headboard with storage.
Planning and Design Considerations
Before commencing any construction, thorough planning is crucial. The design should take into account the dimensions of the bed, the height of the dorm room ceilings, and the available floor space. Consider the overall aesthetic of the room and choose materials that complement the existing décor. Functionality should also be a primary consideration. Decide what types of items the storage compartments will hold and design the shelves, drawers, or cubbies accordingly.
Start by measuring the width of the bed frame or mattress. The headboard should be at least this wide, and it may extend slightly beyond the edges for a more substantial look. Determine the desired height of the headboard. A taller headboard can create a more dramatic effect, but it should not overwhelm the space. Consider the height of the dorm room ceiling and ensure that the headboard will fit comfortably without appearing cramped.
Next, sketch out several design options incorporating different storage solutions. Consider open shelving for books and decorative items, closed cabinets for storing personal belongings out of sight, and built-in charging stations for electronic devices. Drawers can provide concealed storage for clothing or other items. When designing the storage compartments, ensure they are easily accessible from the bed.
Once a design is selected, create a detailed materials list. This will include the type and quantity of wood, hardware (screws, nails, hinges, drawer pulls), finishing materials (paint, stain, varnish), and any decorative elements. Calculate the total cost of the project to ensure it aligns with the budget.
Material Selection and Construction Techniques
The choice of materials will significantly impact the look and durability of the headboard. Plywood, medium-density fiberboard (MDF), and solid wood are common choices. Plywood is an affordable and versatile option that can be easily cut and shaped. MDF provides a smooth surface for painting or laminating but is less resistant to moisture than plywood. Solid wood offers a classic and durable option, but it is generally more expensive.
For the structural frame of the headboard, consider using 2x4 lumber. This provides a sturdy and reliable base for attaching the panels and storage compartments. Ensure the lumber is straight and free from knots or defects.
When constructing the headboard, begin by building the frame. Cut the lumber to the desired dimensions and assemble it using screws or nails. Ensure the frame is square and level before proceeding. Next, attach the plywood or MDF panels to the frame. Use wood glue and screws to secure the panels in place. Fill any gaps or imperfections with wood filler and sand the surface smooth.
For the storage compartments, consider using a combination of open shelves, closed cabinets, and drawers. Open shelves can be created by simply attaching horizontal pieces of wood to the frame. Closed cabinets can be constructed by building boxes with doors. Use hinges to attach the doors to the cabinets. Drawers can be built using drawer boxes and slides. Ensure the drawer slides are properly aligned to allow the drawers to open and close smoothly.
When assembling the storage compartments, use wood glue and screws to secure the pieces together. Ensure the compartments are level and aligned properly. Consider adding decorative trim or molding to the edges of the headboard for a more finished look.
After the headboard is assembled, sand all surfaces smooth and prepare them for finishing. Apply a primer to the wood to create a smooth and even surface for the paint or stain. Choose a paint or stain color that complements the room's décor.
Apply several coats of paint or stain, allowing each coat to dry completely before applying the next. After the final coat of paint or stain has dried, apply a clear topcoat to protect the finish and enhance its durability. Use a brush or spray gun to apply the topcoat evenly. Allow the topcoat to dry completely before installing the headboard.
Storage Design Options for Dorm Headboards
The storage design of a dorm headboard can be customized to fit specific needs and preferences. Several popular options offer varying degrees of storage capacity and accessibility.
Open Shelving
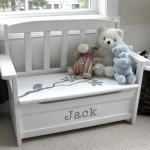
Open shelving is a simple and versatile storage solution for a dorm headboard. It provides easy access to books, magazines, and other items. Open shelves can be arranged in a variety of configurations to suit different needs. For example, a series of narrow shelves can be used to store books and decorative items, while a larger shelf can be used to hold a lamp or alarm clock.
When designing open shelving, consider the spacing between the shelves. Adjust the spacing to accommodate the size of the items that will be stored on the shelves. Use shelf supports to prevent the shelves from sagging under the weight of the items.
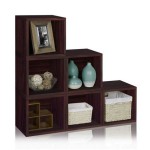
Closed Cabinets
Closed cabinets provide concealed storage for personal belongings, such as clothing, electronics, and toiletries. Cabinets are a good option for students who want to keep their belongings out of sight and maintain a tidy dorm room. Cabinets can be equipped with doors and latches to secure the contents.
When designing closed cabinets, consider the size and shape of the items that will be stored inside. Design the cabinets to provide ample space for the items. Install shelves inside the cabinets to maximize storage capacity. Use adjustable shelves to customize the storage space to fit different needs.
Built-in Charging Stations
Built-in charging stations offer a convenient way to charge electronic devices, such as smartphones, tablets, and laptops. Charging stations can be integrated into the headboard design to provide easy access to power outlets and USB ports. This eliminates the need for messy cords and adapters.
When designing a built-in charging station, ensure that it complies with electrical safety codes. Use a surge protector to protect electronic devices from power surges. Consider adding a cord management system to keep the cords organized and out of sight.
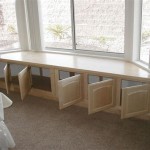
Drawers
Drawers provide a discreet and organized storage solution for clothing, bedding, or personal items. They are particularly useful for maximizing space in smaller dorm rooms. Drawers can be built into the base of the headboard or incorporated as separate units within the design.
When constructing drawers, ensure they glide smoothly and are properly aligned. Invest in quality drawer slides for optimal functionality. Consider adding dividers within the drawers to further organize contents.
Assembly and Installation
Once the headboard is constructed and finished, it is time to assemble and install it. The assembly process will vary depending on the design of the headboard. For a simple headboard with open shelves, the assembly may simply involve attaching the shelves to the frame. For a more complex headboard with cabinets and drawers, the assembly may involve attaching the cabinets and drawers to the frame and installing the doors and drawer slides.
Before installing the headboard, ensure that the bed frame is properly positioned against the wall. Use a level to ensure that the bed frame is level. If the bed frame is not level, use shims to level it.
The headboard can be attached to the bed frame or directly to the wall. If attaching the headboard to the bed frame, use bolts or screws to secure it in place. Ensure that the headboard is securely attached to the bed frame to prevent it from tipping over.
If attaching the headboard directly to the wall, use wall anchors to secure it in place. The type of wall anchors will depend on the type of wall. For drywall, use drywall anchors. For concrete walls, use concrete anchors. Follow the manufacturer's instructions when installing the wall anchors.
After the headboard is installed, inspect it carefully to ensure that it is stable and secure. Check that all screws and bolts are tightened properly. Make any necessary adjustments to ensure that the headboard is level and aligned properly.
With careful planning, material selection, and construction techniques, a stylish and functional DIY headboard with storage can significantly enhance the dorm room living experience. It provides a personalized touch, maximizes space, and offers convenient organizational solutions.

How To Make A Headboard With Storage

Dorm Room S And College Tips

14 Insanely Cute Dorm Headboard Ideas That Will Make Your Look Way Better By Sophia Lee

College Dorm Room Headboard By Sophia Lee

20 Amazing Diy Headboard Ideas For You New Dorm Society19

10 Best Dorm Room Headboard Ideas College Headboards

10 Best Dorm Room Headboard Ideas College Headboards

23 Under Bed Dorm Storage Ideas You Need In Your Room

Boys Dorm Room Decor And Organizing Essentials Dimples Tangles

22 Trendy Space Saving Dorm Decor Ideas Extra Storage
Related Posts