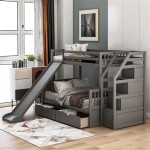
DIY King Size Bed Frame With Storage: A Comprehensive Guide
A king-size bed offers sprawling comfort and ample space, making it a popular choice for couples and individuals who appreciate extra room to stretch out. However, the footprint of a king-size bed can present storage challenges, particularly in smaller bedrooms. Building a DIY king-size bed frame with integrated storage provides a practical and aesthetically pleasing solution, maximizing space while adding a personalized touch to the bedroom.
This article provides a comprehensive guide to constructing a king-size bed frame with storage, covering essential planning, material selection, step-by-step building instructions, and finishing techniques. The project requires basic carpentry skills, a well-equipped workshop, and a commitment to precision. Careful planning and adherence to the instructions will result in a sturdy and functional bed frame designed to last for years.
Key Planning Considerations
Before embarking on the construction process, careful planning is crucial. This includes determining the desired storage configuration, selecting appropriate materials, and creating detailed plans and measurements. Neglecting these initial steps can lead to errors and inefficiencies during the build.
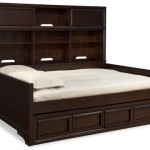
The first step is to define storage needs. Consider what items require storage, such as linens, blankets, clothing, or other personal belongings. This will inform the type and number of storage compartments to incorporate into the bed frame design. Options include drawers that slide out from the sides or foot of the bed, lift-up platforms that reveal storage underneath, or a combination of both. The chosen storage mechanism will influence the overall design and construction process.
Accurate measurements are paramount. Begin by measuring the king-size mattress to determine the inner dimensions of the bed frame. The frame should be slightly larger than the mattress to allow for easy placement and removal. Account for the thickness of the chosen materials when calculating the overall dimensions. A detailed sketch or CAD drawing outlining all dimensions, including the height, width, and depth of the frame and storage compartments, is highly recommended. This visual representation serves as a blueprint throughout the project.
Material selection is another critical aspect of planning. Wood is the most common material for bed frames due to its strength, durability, and aesthetic appeal. Popular choices include pine, oak, maple, and cedar. Pine is an affordable option suitable for painting or staining, while hardwoods like oak and maple offer superior strength and a more refined appearance. Cedar is naturally resistant to insects and rot, making it an excellent choice for storage compartments. The selected wood should be straight, free from knots, and properly seasoned to prevent warping or cracking. Plywood or MDF (Medium-Density Fiberboard) can be used for the base of storage compartments or as a backing material.
In addition to wood, consider the hardware and fasteners required for the project. This includes screws, nails, wood glue, drawer slides, hinges, and handles. Choose high-quality hardware that can withstand the weight and stress associated with a king-size bed frame. Select appropriate fasteners for the type of wood used and ensure they are long enough to provide a secure connection.
Step-by-Step Construction Process
With a comprehensive plan and materials in hand, the construction process can begin. The following steps outline a general procedure for building a king-size bed frame with storage. The specific steps may vary depending on the chosen design and storage configuration.
The first step is to build the frame's perimeter. Cut the side rails, headboard, and footboard to the designated lengths according to the previously established plan. Use a miter saw or circular saw to ensure accurate and clean cuts. Assemble the frame by joining the side rails to the headboard and footboard using screws and wood glue. Clamps can be used to hold the pieces together while the glue dries. Ensure that the frame is square and level before proceeding.
Next, construct the internal support structure. This structure provides additional strength and stability to the bed frame and supports the mattress. Cut lumber to the required lengths and assemble a grid-like frame inside the perimeter frame. The spacing between the support beams should be appropriate for the thickness of the mattress and the expected weight load. Secure the support structure to the perimeter frame using screws and wood glue.
The construction of storage compartments follows. This process will vary depending on the type of storage chosen. For drawers, build the drawer boxes using plywood or solid wood. Assemble the drawer boxes using screws, nails, or dovetail joints for added strength. Install drawer slides on the drawer boxes and on the inside of the bed frame to allow for smooth and easy opening and closing. For lift-up platforms, construct the platform frame and attach hinges to allow it to pivot upwards. Add gas struts or other lifting mechanisms to assist with lifting and holding the platform in the open position.
After constructing the storage compartments, install the base for the mattress. This can be a solid sheet of plywood or a series of slats. Slats provide better ventilation and can improve mattress comfort. Space the slats evenly across the support structure and secure them using screws or nails. Ensure that the base is level and can adequately support the mattress and occupants.
Once the frame is assembled and the storage compartments are in place, reinforcing the structure is essential. Apply corner braces to the inside corners of the frame to add strength and prevent racking. Check all joints and connections to ensure they are secure. Add additional screws or fasteners as needed.
Finishing and Aesthetic Considerations
The final step is to finish the bed frame to protect the wood and enhance its appearance. This involves sanding, staining or painting, and applying a protective topcoat. The chosen finish should complement the bedroom decor and personal preferences.
Begin by sanding the entire bed frame using progressively finer grits of sandpaper. Start with a coarser grit to remove any imperfections and then move to a finer grit for a smooth finish. Sand the wood in the direction of the grain to avoid scratching. Remove all sanding dust with a tack cloth before proceeding.
Staining or painting the bed frame is the next step. If staining, apply the stain evenly using a brush, rag, or sprayer. Allow the stain to penetrate the wood for the recommended time and then wipe off any excess. Apply multiple coats of stain for a richer color. If painting, apply a primer coat followed by two or more coats of paint. Use a high-quality paint designed for wood and apply it evenly using a brush, roller, or sprayer.
A protective topcoat is crucial for protecting the finish and enhancing its durability. Apply a clear coat of polyurethane or varnish over the stain or paint. This will protect the wood from scratches, moisture, and UV damage. Apply multiple coats of topcoat for added protection. Sand lightly between coats to ensure a smooth finish.
Consider adding decorative elements to personalize the bed frame. This could include adding trim, molding, or decorative hardware. Upholstering the headboard or footboard can add a touch of elegance and comfort. Choose fabrics and colors that complement the bedroom decor. Adding LED strip lighting under the bed frame can create a soft and ambient glow.
Finally, before placing the mattress on the bed frame, inspect the entire structure for any sharp edges or protruding fasteners. Sand down any sharp edges and countersink any protruding fasteners to prevent injury. Ensure that the storage compartments operate smoothly and that all drawers and platforms are securely in place.
Building a DIY king-size bed frame with storage is a rewarding project that combines functionality with personal expression. By carefully planning the design, selecting appropriate materials, and following the construction steps outlined above, individuals can create a custom bed frame that maximizes space, enhances the bedroom decor, and provides years of comfortable sleep.

Make A King Sized Bed Frame With Lots Of Storage

Platform Storage Bed Frame Diy With

Diy Storage Bed Printable Woodworking Plans And Tutorial

Farmhouse Storage Bed Kreg Tool

Classic Storage Bed King Ana White

Diy Storage Bed Printable Woodworking Plans And Tutorial

King X Barn Door Farmhouse Bed Plans Her Tool Belt

How To Build A Platform Storage Bed For Under 200 Diy Bedroom

Diy King Platform Bed With Storage How To Build

Diy Queen Bed Frame With Storage Plans Wilker Do S
Related Posts