How To Build A Garage Ceiling Storage Rack In Singapore 2024
In Singapore, efficient space utilization is paramount, particularly in densely populated urban environments. Maximizing available space in residential areas often involves innovative storage solutions. The garage, frequently used for parking vehicles, can also serve as a valuable storage area. Utilizing the vertical space within a garage by constructing a ceiling storage rack presents a practical method for decluttering and organizing various items, ranging from seasonal decorations to sporting equipment. This article will outline the process of building a garage ceiling storage rack suitable for the conditions commonly found in Singaporean homes in 2024. These conditions include consideration of humidity, space constraints, and readily available materials.
Before commencing any construction project, it is crucial to assess the structural integrity of the garage ceiling. The ceiling must be capable of supporting the weight of the storage rack and the items it will hold. Typically, garage ceilings are constructed with wooden joists or concrete slabs. Wooden joists are generally spaced 16 to 24 inches apart, while concrete slabs are more common in newer or high-rise residential buildings. The load-bearing capacity of the ceiling should be verified, possibly by consulting with a structural engineer, especially if there are any doubts about its strength. Failure to ensure adequate structural support can lead to safety hazards and potential damage to the garage structure.
Understanding local building regulations and obtaining the necessary permits, if required, is also crucial. While constructing a simple storage rack may not necessitate extensive permits in all cases, it is prudent to check with the Building and Construction Authority (BCA) in Singapore to ascertain the applicable regulations. Compliance with building codes ensures safety and avoids potential penalties.
Planning and Design
The first step in building a garage ceiling storage rack is meticulous planning and design. This involves determining the dimensions of the rack, the materials to be used, and the method of attachment to the ceiling. Consider the items that will be stored on the rack and their weight. This will influence the dimensions of the rack, the spacing between support beams, and the overall load-bearing capacity. A detailed design drawing, even a simple sketch, is essential for visualizing the finished product and ensuring that all necessary materials are accounted for.
The dimensions of the rack should be determined based on the available space in the garage and the specific storage needs. Measure the garage ceiling height and width and identify any obstructions such as pipes, electrical wiring, or overhead garage door mechanisms. Consider leaving sufficient headroom to prevent accidental collisions with the rack. A typical storage rack might be 4 feet wide, 8 feet long, and 1 to 2 feet high, but these dimensions can be adjusted to suit individual requirements.
Materials selection is also crucial. In Singapore's humid climate, choosing materials resistant to moisture and corrosion is essential. Galvanized steel or powder-coated metal are excellent options for the frame and supports, as they offer superior resistance to rust. For the storage platform itself, plywood treated with a water-resistant sealant is a suitable choice. Avoid using untreated wood, as it is susceptible to rot and insect infestation. The hardware used for assembly, such as bolts, screws, and brackets, should also be made of stainless steel or galvanized steel to prevent corrosion.
Determine the method of attachment to the ceiling. For wooden joists, lag bolts are a common and reliable option. The length of the lag bolts should be sufficient to penetrate deeply into the joists, typically at least 3 inches. For concrete ceilings, concrete anchors are necessary. These anchors can be expansion bolts or chemical anchors, depending on the load requirements and the type of concrete used. Ensure that the anchors are properly installed according to the manufacturer's instructions. It is advisable to consult with a hardware specialist to select the appropriate anchors for the specific type of concrete.
Materials and Tools
After finalizing the design, gather the necessary materials and tools. The following list provides a general overview of the items required for building a garage ceiling storage rack:
- Galvanized steel or powder-coated metal for the frame and supports
- Plywood (treated with water-resistant sealant) for the storage platform
- Lag bolts or concrete anchors for attachment to the ceiling
- Stainless steel or galvanized steel bolts, screws, and brackets for assembly
- Measuring tape
- Level
- Drill with appropriate drill bits (for wood or concrete)
- Wrench or socket set
- Safety glasses
- Gloves
- Stud finder (if attaching to wooden joists)
- Ladder
- Saw (for cutting plywood)
Ensure that all tools are in good working condition and that appropriate safety gear is worn at all times during the construction process. Working at heights requires extra caution, so ensure the ladder is stable and secure.
Construction Process
The construction process involves several steps, from assembling the frame to attaching the rack to the ceiling. The following provides a detailed outline of the process.
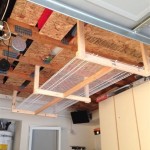
Step 1: Assemble the Frame: Cut the metal or wood components for the frame according to the design specifications. Use bolts, screws, and brackets to assemble the frame. Ensure that all connections are secure and that the frame is square and level. If welding is required, ensure proper safety precautions are taken, and only qualified individuals should perform welding tasks. Verify that the dimensions of the assembled frame match the design specifications.
Step 2: Install Support Beams: Install support beams within the frame to provide additional strength and prevent sagging. The spacing between support beams should be determined based on the weight of the items to be stored. Generally, spacing support beams every 2 feet is sufficient for most applications. Secure the support beams to the frame using bolts, screws, or welding.
Step 3: Attach Plywood Platform: Cut the plywood platform to fit the frame. Secure the plywood to the frame using screws. Ensure that the screws are countersunk to prevent them from snagging on items stored on the rack. Apply a water-resistant sealant to the edges of the plywood to protect it from moisture.
Step 4: Locate Ceiling Joists or Concrete Slab: Use a stud finder to locate the ceiling joists if attaching to a wooden ceiling. Mark the location of the joists clearly. If attaching to a concrete ceiling, identify the areas where the concrete is solid and free from cracks or voids. Ensure that the attachment points are spaced evenly to distribute the weight of the rack and its contents.
Step 5: Attach the Rack to the Ceiling: With the assistance of another person, lift the assembled rack into position. Align the rack with the marked locations of the ceiling joists or concrete slab. Use a drill to pre-drill pilot holes for the lag bolts or concrete anchors. Insert the lag bolts or concrete anchors and tighten them securely. Ensure that the rack is level and securely attached to the ceiling. Double-check all attachments to ensure they are properly tightened.
Step 6: Final Inspection: Once the rack is installed, conduct a final inspection to ensure that it is securely attached to the ceiling and that all connections are tight. Test the rack by applying a moderate amount of weight to it and checking for any signs of sagging or instability. If any issues are detected, address them immediately before storing any items on the rack.
Step 7: Load Testing and Weight Distribution Before fully loading the rack, it's prudent to perform a load test. This involves placing a moderate amount of weight evenly across the rack to observe its stability. If the rack shows any signs of significant deflection or instability, reinforce the structure by adding more support beams or reinforcing the ceiling attachment points. When loading the rack, distribute the weight evenly to prevent localized stress. Heavier items should be placed closer to the support beams or the center of the rack. Avoid overloading the rack beyond its designed weight capacity.
Safety Considerations
Safety is paramount when building and using a garage ceiling storage rack. The following safety considerations should be observed at all times:
- Wear safety glasses and gloves during the construction process.
- Use a stable ladder and ensure it is properly positioned.
- Avoid working alone; always have someone assist with lifting and attaching the rack.
- Do not overload the rack beyond its designed weight capacity.
- Store heavy items closer to the support beams.
- Regularly inspect the rack for signs of wear or damage.
- Ensure that the rack is securely attached to the ceiling.
Maintenance and Inspection
Regular maintenance and inspection are crucial to ensure the continued safety and functionality of the garage ceiling storage rack. Conduct periodic inspections to check for signs of rust, corrosion, or damage to the frame, supports, or platform. Tighten any loose bolts or screws. Reapply water-resistant sealant to the plywood as needed. If any significant damage is detected, repair or replace the affected components immediately.
The humid climate of Singapore can accelerate the corrosion of metal components. Applying a rust-inhibiting coating to the metal frame and supports can help to prolong their lifespan. Keep the rack clean and free from debris to prevent moisture buildup. Regularly vacuum or wipe down the platform to remove dust and dirt. Ensure that the garage is well-ventilated to reduce humidity levels.
Properly constructed and maintained garage ceiling storage racks can significantly enhance space utilization and organization in Singaporean homes. By following the guidelines outlined in this article, homeowners can build safe, durable, and functional storage solutions that meet their specific needs.

Overhead Storage Garage Boss

Garage Overhead Storage By Saferacks Traditional Garden Shed And Building Orange County Houzz Ie

Overhead Storage Garage Boss

Diy Garage Shelves Plans Easy Neat And Functional

Garage And Home Storage Ideas Traditional Garden Shed Building Orange County By Saferacks Houzz

Tote Storage Rack Diy Plans 27 Gallon Step By Build Plan Multi Options Garage Bin

Metal Overhead Storage Ceiling Mounted Rack Made In China Com

4x8ft Overhead Garage Storage Racks Adjustable Ceiling Rack Made In China Com

Heavy Duty Overhead Garage Storage Rack For 4 Bins Adjustable Width Bin

Genius Garage Organization Ideas To Kickstart The New Year
Related Posts