How to Build a King Bed Frame with Storage
Building a king bed frame with integrated storage offers a practical solution for maximizing space and decluttering a bedroom. This article provides a comprehensive guide on constructing such a bed frame, encompassing material selection, cutting, assembly, and finishing. This project demands intermediate woodworking skills and access to essential power tools. Precision and careful attention to detail are crucial for a structurally sound and aesthetically pleasing result.
Planning and Material Selection
The initial phase involves meticulous planning and selecting appropriate materials. Accurate measurements of the mattress are paramount, ensuring the frame provides adequate support and a snug fit. Standard king-size mattresses typically measure 76 inches wide and 80 inches long, but verifying these dimensions before commencing construction is advised. Add approximately 1-2 inches to these measurements when determining the internal dimensions of the bed frame to allow for ease of movement and bedding.
The choice of wood profoundly impacts the bed frame’s durability and appearance. Solid hardwoods, such as oak, maple, or walnut, provide superior strength and longevity. However, they are also more expensive and require more specialized tools for cutting and shaping. Softwoods, like pine or fir, offer a more budget-friendly option, but may be more susceptible to dents and scratches. Furniture-grade plywood, often used for the base and storage components, can provide a stable and cost-effective alternative. Consider the desired aesthetic and budget constraints when making this decision.
Beyond lumber, a variety of hardware will be necessary. This includes wood screws of varying lengths, wood glue, metal brackets for reinforcement (optional but recommended), drawer slides for smooth drawer operation, hinges for any storage compartments with doors, and finishing materials such as sandpaper, stain, and sealant. High-quality hardware ensures the structural integrity of the bed frame and the longevity of its moving parts.
Before purchasing materials, create a detailed cutting list based on the planned dimensions. This list specifies the exact measurements of each piece of lumber required, minimizing waste and facilitating efficient cutting. It's beneficial to sketch a detailed diagram of the bed frame, labeling each component with its dimensions and material designation. This visual representation serves as a blueprint throughout the construction process.
Construction of the Bed Frame
The construction phase begins with cutting the lumber according to the cutting list. Employ accurate measuring techniques and a sharp saw for clean, precise cuts. A miter saw is highly recommended for creating square and angled cuts with consistent accuracy. If using plywood, a circular saw with a plywood blade minimizes splintering. Always wear safety glasses and ear protection during cutting operations.
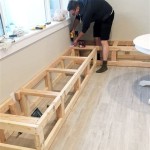
The core of the bed frame consists of the side rails, headboard, and footboard. These components form the perimeter of the frame and provide structural support. Join the side rails to the headboard and footboard using wood screws and wood glue. Pre-drilling pilot holes prevents the wood from splitting. For added strength, metal brackets can be installed at the corners. Ensure the assembled frame is square by measuring diagonally across the corners; the measurements should be equal.
Next, construct the internal support structure. This typically involves adding lengthwise and crosswise supports within the frame to prevent sagging and provide a stable surface for the mattress. These supports can be constructed from 2x4 lumber or plywood. Secure these supports to the side rails, headboard, and footboard using wood screws and wood glue. The spacing of the supports depends on the mattress type and the desired level of support.
If incorporating drawers into the design, now is the time to build the drawer boxes. Measure the internal dimensions of the space allotted for the drawers and subtract the necessary clearances for the drawer slides. Assemble the drawer boxes using wood screws, wood glue, and clamps. Apply wood glue to all joints and clamp the boxes until the glue has dried. Ensure the drawer boxes are square and the dimensions are accurate to ensure smooth operation.
Install the drawer slides on the inside of the bed frame and on the sides of the drawer boxes. Follow the manufacturer's instructions for proper installation. Test the drawers to ensure they slide smoothly and align correctly. Adjust the drawer slides as needed to achieve optimal performance.
For storage compartments with doors, construct the doors from plywood or solid wood. Install hinges on the doors and the bed frame, ensuring the doors swing smoothly and close securely. Magnetic catches can be added to hold the doors closed. Align the hinges to prevent binding and ensure a uniform gap around the door perimeter.
Finishing and Assembly
After the construction is complete, sand all surfaces smooth using progressively finer grits of sandpaper. Start with a coarser grit (e.g., 120 grit) to remove imperfections and then move to finer grits (e.g., 220 grit) to achieve a smooth finish. Remove all sanding dust with a vacuum cleaner or tack cloth prior to applying the finish.
Apply a stain or paint to the bed frame to enhance its appearance and protect the wood. Follow the manufacturer's instructions for application. Apply multiple coats for a richer color and greater durability. Allow each coat to dry completely before applying the next. A clear topcoat, such as polyurethane or varnish, can be applied to protect the finish from scratches and moisture.
Assemble the bed frame in the bedroom where it will be used. Tighten all screws and bolts to ensure the frame is sturdy and stable. Place the mattress on the frame and test its stability. Adjust the supports as needed to ensure the mattress is evenly supported.
Install drawer pulls or knobs on the drawers and doors to complete the project. Choose hardware that complements the style of the bed frame and provides a comfortable grip. Tighten the screws securely to prevent the hardware from loosening over time.
The completed king bed frame with storage offers a functional and aesthetically pleasing addition to any bedroom. By carefully planning, accurately cutting, and meticulously assembling the components, a durable and space-saving bed frame can be created to last for years to come.

Make A King Sized Bed Frame With Lots Of Storage

Diy Storage Bed Printable Woodworking Plans And Tutorial

Cal King Platform Storage Bed Free Plans Sawdust Girl

Platform Storage Bed Frame Diy With

Diy Storage Bed Printable Woodworking Plans And Tutorial

Farmhouse Storage Bed Kreg Tool

King X Barn Door Farmhouse Bed Plans Her Tool Belt

Classic Storage Bed King Ana White

Full Size Bed Designs Diy Storage Platform Frame

King X Barn Door Farmhouse Bed Plans Her Tool Belt
Related Posts